Call M.A.C. Stewart Plumbing Today (705)733-5154
Full Toilet Repair, Replace and Supply Services
Toilet Repair
Leaking Tanks
A leaky toilet is a costly and wasteful problem. Toilet leaks are most commonly caused when a defective flush valve does not seat properly to form a water tight seal. Water will then leak around it into the toilet bowl. A clogged or leaking toilet can cause significant damage to your home and property if not dealt with in a professional manner. If your toilet is clogged or leaking, contact the professionals at M.A.C. Stewart Plumbing.
Running Toilets
Runny toilets are money and water wasters, contact us for punctual water seepage detection and fast correction.
Tens of thousands of water gallons are overused by a single leaky toilet each year. For sake of the environment, not to mention your bank account, you should occasionally inspect the commodes in home. Replacement parts are available even for older ballcock/flush ball toilet tank valves. You can also you install plastic devices instead of repairing the original parts to give your toilet a modern upgrade.
Look for Leaks
The tank contains 2 valves, which are a flush valve and a refill valve. One common type of refill valve is called a ballcock.
When the flush valve is unable to rest in a proper position, water leaks from the tank to the bowl. The leaked tank water is replenished by the refill valve, causing a continuous flow water that is wasted along with money.
If the refill valve leaks, the tank overfills, and the excess water runs from the overflow pipe into the toilet bowl. When the float becomes waterlogged, the end result is an overflowing toilet and a mess on the bathroom floor.
Refer to the illustration to learn how to check for a leaky flush valve. Close the water supply and note the water level. If the water gradually lowers from its original position, you can conclude that the flush valve it messed up. Otherwise, it must be the refill valve.
To check not only the flush valve, but also the refill valve, add a few drops of food dye into the toilet tank when the tank is fully refilled after a flush. Don't flush the tank again until you have inspected the toilet bowl 10 minutes later for signs of color. If the bowl water becomes tinted, there's definitely a leak.
Simple Adjustments
A few quick adjustments may give your toilet just the tune-up it needs.
Traditional block-style refill valves can be correct by manipulating the arm. Most tanks have a colored or molded water level mark. The water level should never be set so low that that the bowl does not refill with trap sealing water. The rule of thumb is to set the water level .75-inches below the top of the overflow pipe.
If the float rubs on other parts, then you must adjust the float arm sideways. Detach it and make sure it has not filled with water. Both a waterlogged float and a damaged float arm should be replaced if needed.
In tanks which make use of modern plastic refill valves, the tank water level is adjusted differently. For tanks that adjust with a hand nut, turn the nut clockwise to raise it and counterclockwise to lower the water level. The tank may also have a sliding pinch clamp on an adjustment rod.
Flush Ball Toilets
Replacements for a flush ball and its actuating mechanism are available, but it may be possible to stop a leak with minor adjustments and save yourself the supply cost. Check the following mechanisms before purchasing replacements.
The guide arm should be centered directly over the seat; moreover, it should drop the flush ball directly into its seat. If the flush ball is not seating properly, make the adjustment as shown in the illustration.
The guide arm should allow the flush ball to rise high enough that the toilet can completely flush. If not, raise the arm, but do not over-lift it. The arm must allow the ball to close completely.
Additionally, problems with flushing may occur if the flush ball does not lift high enough for a complete flush. To make sure that doesn't happen, inspect the lift wire and adjust it as needed.
Lifting Hardware
The lifting hardware may also be the cause of a flushing problem. When functioning properly, the hardware will act to raise the flapper, thus beginning a flush.
Sometimes, maladjusted hardware completely off it's seat. Such a problem indicates that the hardware is too short. Depending upon the toilet, you can make the necessary tweaks by adjusting either the flapper or the refill tube.
Refill Tube
Your toilet's refill tube should be pointed directly toward the overflow pipe. When properly aligned, the refill tube will not rest below the water level. When the tube is below the water level, it will pull tank water away.
In a well functioning toilet, water is directed into the bowl during the refill process; however, if the bowl refill tube has become misaligned, water will go directly into the tank.
If you think that may be the case, listen carefully after a flush. If the refill tube is out of place, then you will hear water splashing while the tank refills.
Refer to the illustration for information on adjusting the refill tube.
Occasionally, you may need to replace, rather than adjust, the refill tube. Simply place one end of the plastic tube over the serrated plastic lug on the body of the valve, and place the plastic holder in the top of the overflow pipe.
Fixing the Flush Valve
The most common culprit of a malfunctioning toilet is a flawed flush valve. There are 3 methods of correcting a faulty flush valve. Many homeowners choose to simply repair the valve, thus saving money on new parts.
Before you can do anything, you must first understand the nature of the problem. Check the hardware in your toilet, particularly the flush bulb and flapper, for crusty deposit accumulation. You may be able to scrub away the crust, but if the hardware is really old, you may have to replace it.
Flapper
Replacing a flapper is quite an easy process. First, you must disconnect everything from the trip arm, then slide the flapper off the pipe. Then all you have to do is install the new flapper.
If the trip handle needs to be adjusted, you can usually fix just by tightening the nut that holds it in place. If the trip handle is old or damages, you should replace it along with the flapper.
Glue-In Repair Kit
For ease of installation, some new style flush valves are simply glued on top of old valve seats. These kits are fast and simple. Just follow the instructions on the packaging and have a sales representative at your local home improvement store help you select the best kit for your toilet.
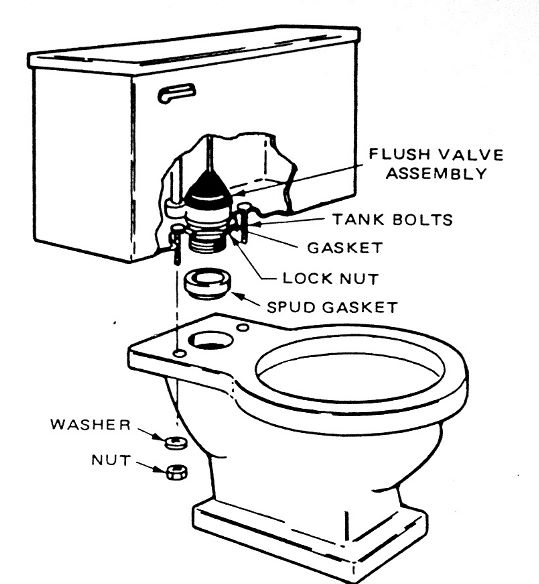
Installing a New Flush Valve
A single nut located on the tank's bottom surface secures flush valves to the tank. In most cases, you will have to remove the tank from the bowl when replacing a flush valve.
Before attempting to detach the tank, you must shut-off the water and drain the commode by holding the trip level in the flushing position. Soak up any remaining water with a sponge.
One the water has been removed, remove the tank from the main water supply. Remove the rubber gasket bolts from the flush valve. Be careful not to force the bolts. Mishandling them may damage the tank. If light force won't remove them, use a hacksaw to cut them off and use new nuts on the replacements.
With the nuts removes, the tank should detach easily from the bowl. Set the tank aside and remove the flush valve with pliers and oil. Clamp the flush valve so that it doesn't rotate inside the tank.
Follow the manufacturer's instructions to install the replacement valve. Use brass bolts to hold the flush valve in place. The brass bolts are easier to work with in the future. Apply the bolts using just enough pressure to keep the unit and place and prevent leaks.Now put everything back together and restore the flow of water.
Repairing the Refill Valve
Many times, brass refill valves can be repaired rather than replaces. Disassemble the valve by removing the screws.Take everything apart and inspect the condition of the rubber washer on the plunger. If the washer is deteriorated, remove it with pliers and install a new one. Then put the valve back together and test the tank to see if it still overflows.
New Refill Valve
If the entire valve must be replaced, begin by shutting off the water. Remove all of the water from the tank and bowl, then remove not only the nut, but also the tube from the refill valve underneath the tank.
Clamp the refill valve and install the replacement unit according to the manufacturer's instructions. Once the valve is in place, you can reconnect the tube and restore the flow of water.
Toilet repair Bradford, ball cock york Region, fill valve Newmarket, toilet gasket Richmond Hill, toilet supply Markham, toilet wont flush Barrie, Innisfil toilet flange leaking, Ceiling leaking from toilet King City, Toilet running Alliston, Toilet tank Sharon, Toilet handle Gilford